正在加载图片...

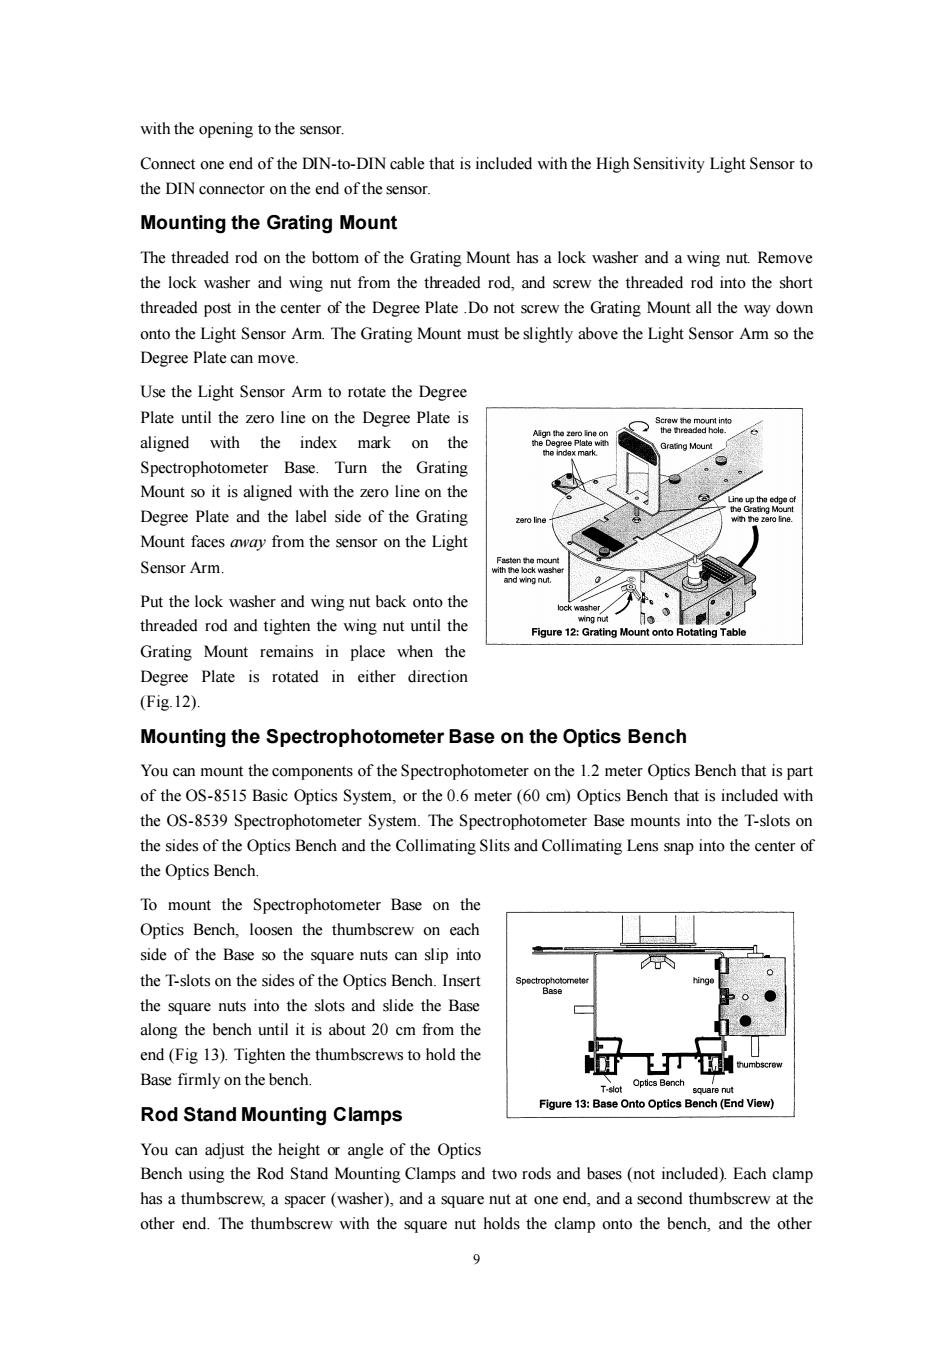
with the opening to the sensor. Connect one end of the DIN-to-DIN cable that is included with the High Sensitivity Light Sensor to the DIN connector on the end of the sensor. Mounting the Grating Mount The threaded rod on the bottom of the Grating Mount has a lock washer and a wing nut.Remove the lock washer and wing nut from the threaded rod,and screw the threaded rod into the short threaded post in the center of the Degree Plate.Do not screw the Grating Mount all the way down onto the Light Sensor Arm.The Grating Mount must be slightly above the Light Sensor Am so the Degree Plate can move. Use the Light Sensor Arm to rotate the Degree Plate until the zero line on the Degree Plate is Align the zero line on aligned with the index mark on the the Degree Plate with Spectrophotometer Base.Turn the Grating Mount so it is aligned with the zero line on the Line up tha edge cf Degree Plate and the label side of the Grating zero line Mount faces away from the sensor on the Light Sensor Arm and wing nut. Put the lock washer and wing nut back onto the threaded rod and tighten the wing nut until the Figure 12:Grating Mount onto Rotating Table Grating Mount remains in place when the Degree Plate is rotated in either direction (Fig.12). Mounting the Spectrophotometer Base on the Optics Bench You can mount the components of the Spectrophotometer on the 1.2 meter Optics Bench that is part of the OS-8515 Basic Optics System,or the 0.6 meter(60 cm)Optics Bench that is included with the OS-8539 Spectrophotometer System.The Spectrophotometer Base mounts into the T-slots on the sides of the Optics Bench and the Collimating Slits and Collimating Lens snap into the center of the Optics Bench. To mount the Spectrophotometer Base on the Optics Bench,loosen the thumbscrew on each side of the Base so the square nuts can slip into the T-slots on the sides of the Optics Bench.Insert the square nuts into the slots and slide the Base along the bench until it is about 20 cm from the end(Fig 13).Tighten the thumbscrews to hold the Base firmly on the bench T-slot Optics Bench」 souare nut Figure 13:Base Onto Optics Bench(End View) Rod Stand Mounting Clamps You can adjust the height or angle of the Optics Bench using the Rod Stand Mounting Clamps and two rods and bases(not included).Each clamp has a thumbscrew,a spacer(washer),and a square nut at one end,and a second thumbscrew at the other end.The thumbscrew with the square nut holds the clamp onto the bench,and the other9 with the opening to the sensor. Connect one end of the DIN-to-DIN cable that is included with the High Sensitivity Light Sensor to the DIN connector on the end of the sensor. Mounting the Grating Mount The threaded rod on the bottom of the Grating Mount has a lock washer and a wing nut. Remove the lock washer and wing nut from the threaded rod, and screw the threaded rod into the short threaded post in the center of the Degree Plate .Do not screw the Grating Mount all the way down onto the Light Sensor Arm. The Grating Mount must be slightly above the Light Sensor Arm so the Degree Plate can move. Use the Light Sensor Arm to rotate the Degree Plate until the zero line on the Degree Plate is aligned with the index mark on the Spectrophotometer Base. Turn the Grating Mount so it is aligned with the zero line on the Degree Plate and the label side of the Grating Mount faces away from the sensor on the Light Sensor Arm. Put the lock washer and wing nut back onto the threaded rod and tighten the wing nut until the Grating Mount remains in place when the Degree Plate is rotated in either direction (Fig.12). Mounting the Spectrophotometer Base on the Optics Bench You can mount the components of the Spectrophotometer on the 1.2 meter Optics Bench that is part of the OS-8515 Basic Optics System, or the 0.6 meter (60 cm) Optics Bench that is included with the OS-8539 Spectrophotometer System. The Spectrophotometer Base mounts into the T-slots on the sides of the Optics Bench and the Collimating Slits and Collimating Lens snap into the center of the Optics Bench. To mount the Spectrophotometer Base on the Optics Bench, loosen the thumbscrew on each side of the Base so the square nuts can slip into the T-slots on the sides of the Optics Bench. Insert the square nuts into the slots and slide the Base along the bench until it is about 20 cm from the end (Fig 13). Tighten the thumbscrews to hold the Base firmly on the bench. Rod Stand Mounting Clamps You can adjust the height or angle of the Optics Bench using the Rod Stand Mounting Clamps and two rods and bases (not included). Each clamp has a thumbscrew, a spacer (washer), and a square nut at one end, and a second thumbscrew at the other end. The thumbscrew with the square nut holds the clamp onto the bench, and the other