Principles of Orthographic Projection 正投影法原理 Form of Projection 投影的形成 Types of Projection 投影法分类 Features of Orthographic Projection正投影特性 Three-view of Component 物体的三视图 Exercises 练习题 请点击相应标题显示其内容 总绿
Principles of Orthographic Projection 正 投 影 法 原 理
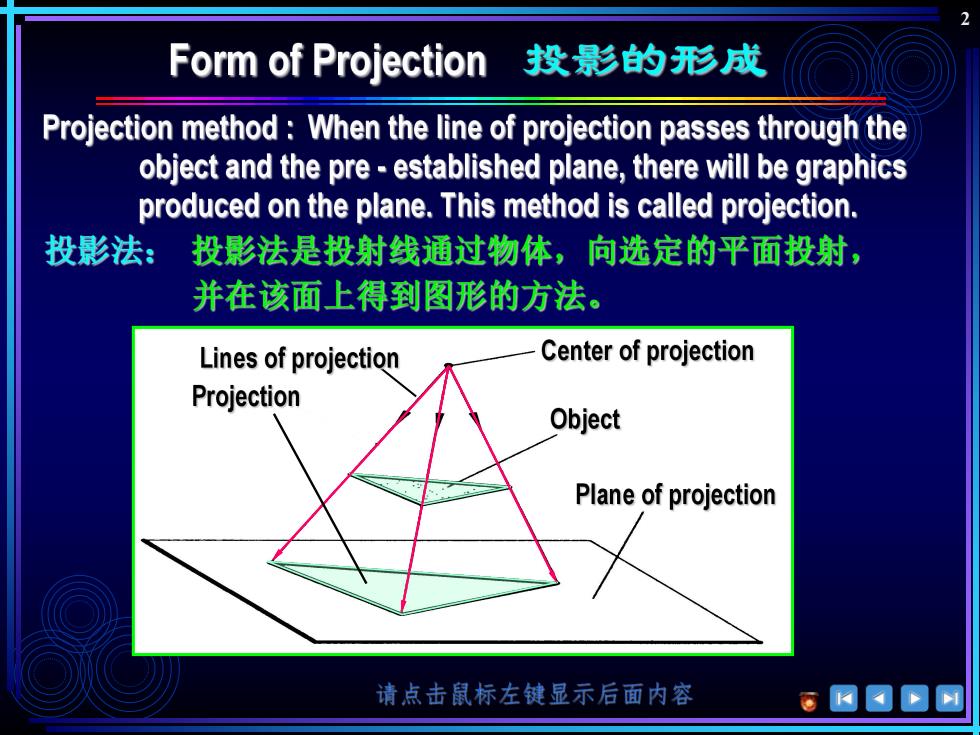
Form of Projection投影的形成 Projection method When the line of projection passes through the object and the pre-established plane,there will be graphics produced on the plane.This method is called projection. 投影法: 投影法是投射线通过物体,向选定的平面投射, 并在该面上得到图形的方法。 Lines of projection Center of projection Projection Object Plane of projection 请点击鼠标左键显示后面内容
2

Types of Projection投影法分类 Central projection method中投影法 (The central projection is mainly used for the pictorial drawings of buildings.一般多用于建筑图样) Projection method 投影法 VP. Parallel projection method平行投影法 It is used in most engineering drawings 广泛用于机械、电子、化工等行业的图样) 请点击鼠标左键显示后面内容
3
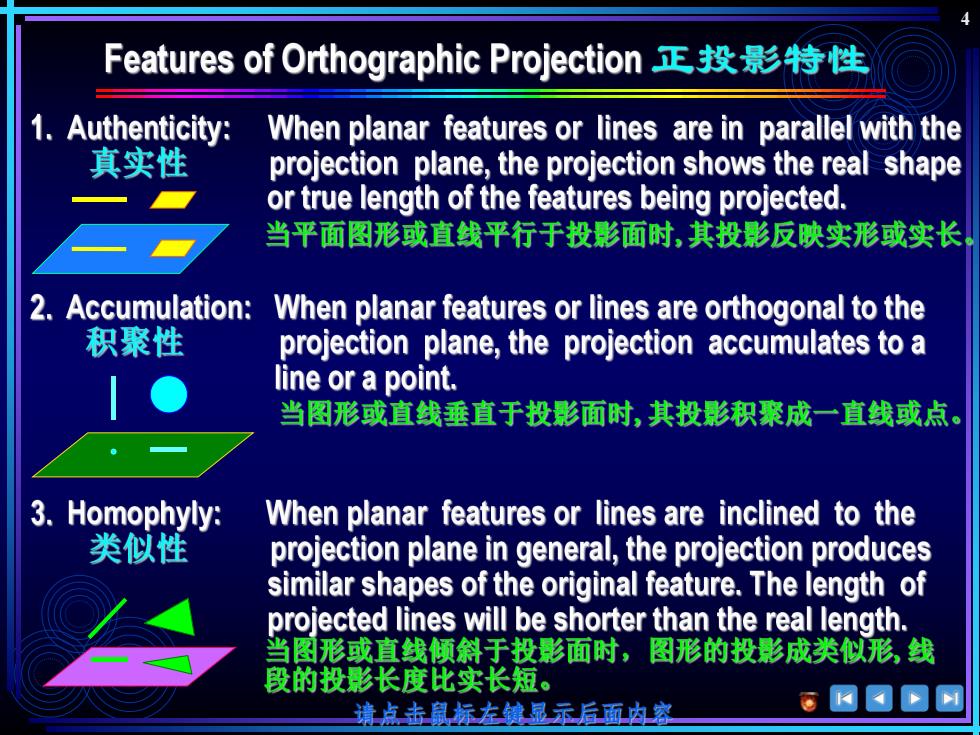
Features of Orthographic Projection正投影特性 1.Authenticity: When planar features or lines are in parallel with the 真实性 projection plane,the projection shows the real shape or true length of the features being projected. 当平面图形或直线平行于投影面时,其投影反映实形或实长, 2.Accumulation: When planar features or lines are orthogonal to the 积聚性 projection plane,the projection accumulates to a line or a point. 当图形或直线垂直于投影面时,其投影积聚成一直线或点。 3.Homophyly: When planar features or lines are inclined to the 类似性 projection plane in general,the projection produces similar shapes of the original feature.The length of projected lines will be shorter than the real length. 当图形或直线倾斜于投影面时,图形的投影成类似形,线 段的投影长度比实长短。 请点击鼠标左键显正后面内空
4
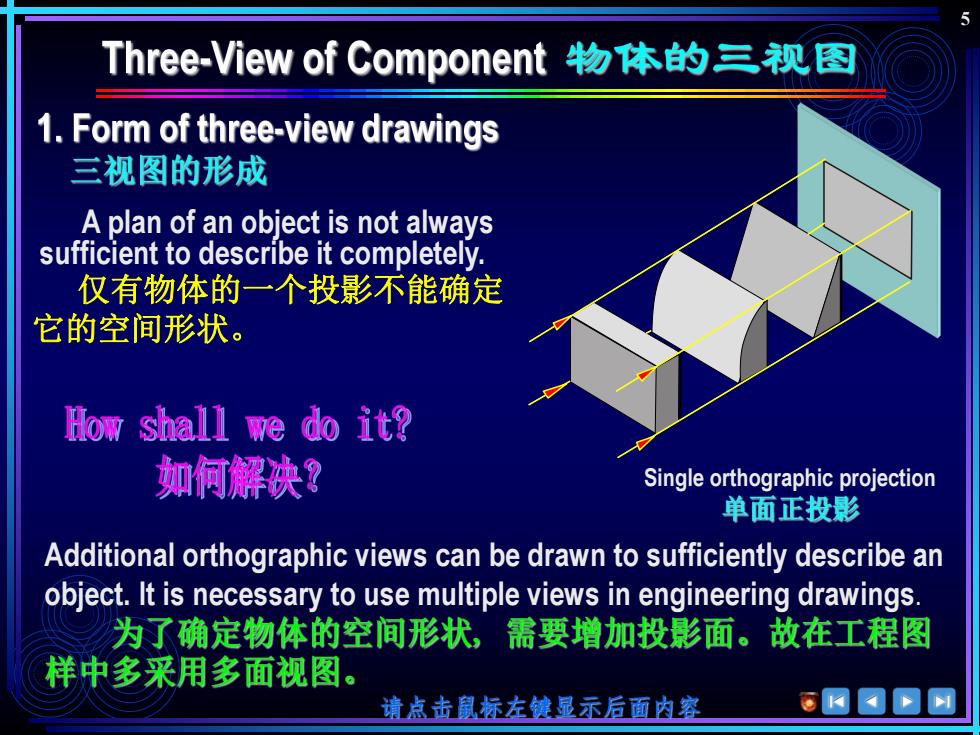
Three-View of Component物体的三视图 1.Form of three-view drawings 三视图的形成 A plan of an object is not always sufficient to describe it completely. 仅有物体的一个投影不能确定 它的空间形状。 How shall we do it? 如何解决? Single orthographic projection 单面正投影 Additional orthographic views can be drawn to sufficiently describe an object.It is necessary to use multiple views in engineering drawings 为了确定物体的空间形状,需要增加投影面。故在工程图 样中多采用多面视图。 靖点击鼠标左健显示后面内容
5 Single orthographic projection A plan of an object is not always sufficient to describe it completely. 仅有物体的一个投影不能确定 它的空间形状。 Additional orthographic views can be drawn to sufficiently describe an object. It is necessary to use multiple views in engineering drawings
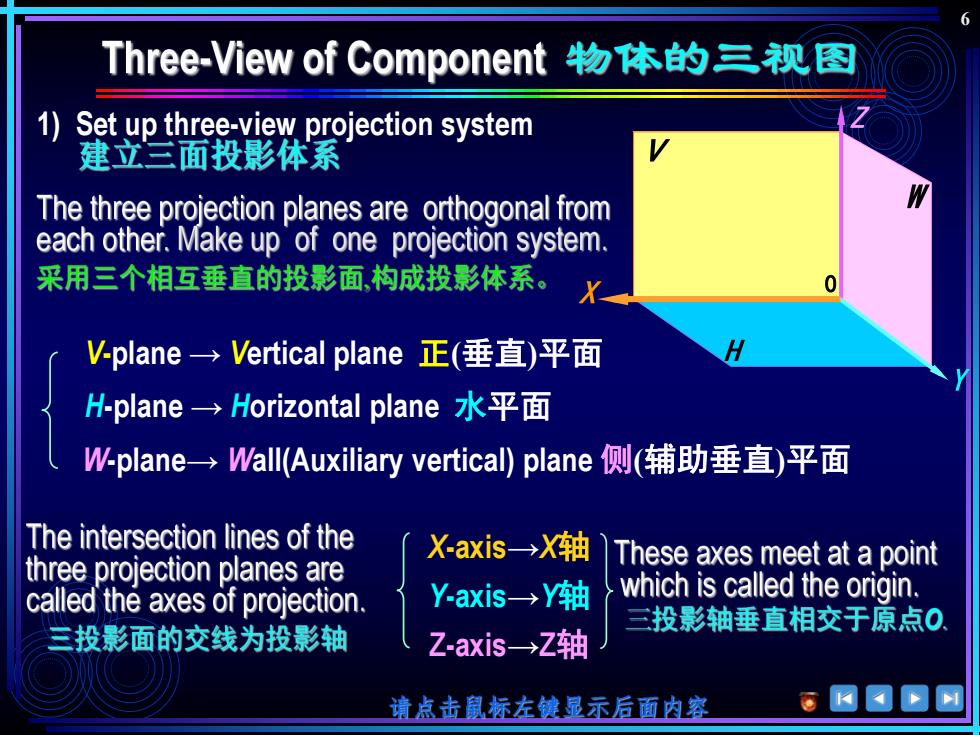
Three-View of Component物体的三视图 1)Set up three-view projection system 建立三面投影体系 The three projection planes are orthogonal from each other.Make up of one projection system. 采用三个相互垂直的投影面,构成投影体系。 0 V-plane→Vertical plane正(垂直)平面 H-plane→Horizontal plane水平面 W-plane→Wall(Auxiliary vertical))plane侧(铺助垂直)平面 The intersection lines of the X-axis-→X轴 three projection planes are These axes meet at a point called the axes of projection. Y-axis→Y轴 which is called the origin. 三投影面的交线为投影轴 三投影轴垂直相交于原点0 Z-axis→Z轴 请点击鼠标左健显示后面内容
6 Y-axis→Y轴 0 1) Set up three-view projection system V-plane → Vertical plane 正(垂直)平面 H-plane → Horizontal plane 水平面 W-plane→ Wall(Auxiliary vertical) plane 侧(辅助垂直)平面 X-axis→X轴 Z-axis→Z轴
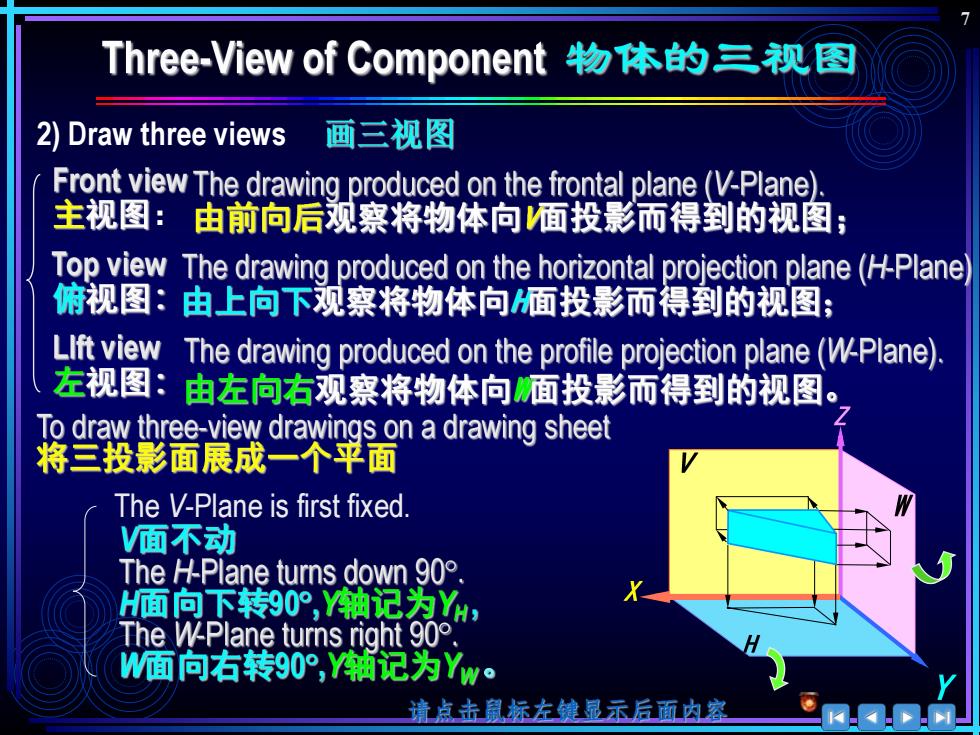
Three-View of Component物体的三视图 2)Draw three views 画三视图 Front view The drawing produced on the frontal plane(V-Plane). 主视图:由前向后观察将物体向面投影而得到的视图; Top view The drawing produced on the horizontal projection plane (H-Plane) 俯视图:由上向下观察将物体向面投影而得到的视图; LIft view The drawing produced on the profile projection plane(W-Plane). 左视图:由左向右观察将物体向面投影而得到的视图。 To draw three-view drawings on a drawing sheet 将三投影面展成一个平面 The V-Plane is first fixed. 面不动 The H-Plane turns down 90 H固向下转90°,衡记为, The W-Plane turns right 90. W面向右转90°,Y轴记为Yw。 请点击鼠标左娘显示后面内容
7 The V-Plane is first fixed. 2) Draw three views :

Three-View of Component物体的三图 2.View positions and rules for producing three-view drawings 三视图的位置关系和投影规律 1)Positions位置关系Z 2)Rules投影规律 The length of the front view and the top view should be aligned and is equal. 主、俯视图长对正; Front view Height Left-side view 主视图 高平齐 侧视图 The height of the front view and the left-side view should Length align be aligned and is equal. 对 45 主、侧视图高平齐: Top view Width equality 俯视图 宽相等 The width of the top view and the left-side view should also be aligned and is equal. 俯、侧视图宽相等。 请点击鼠标左健显示后面内容
8
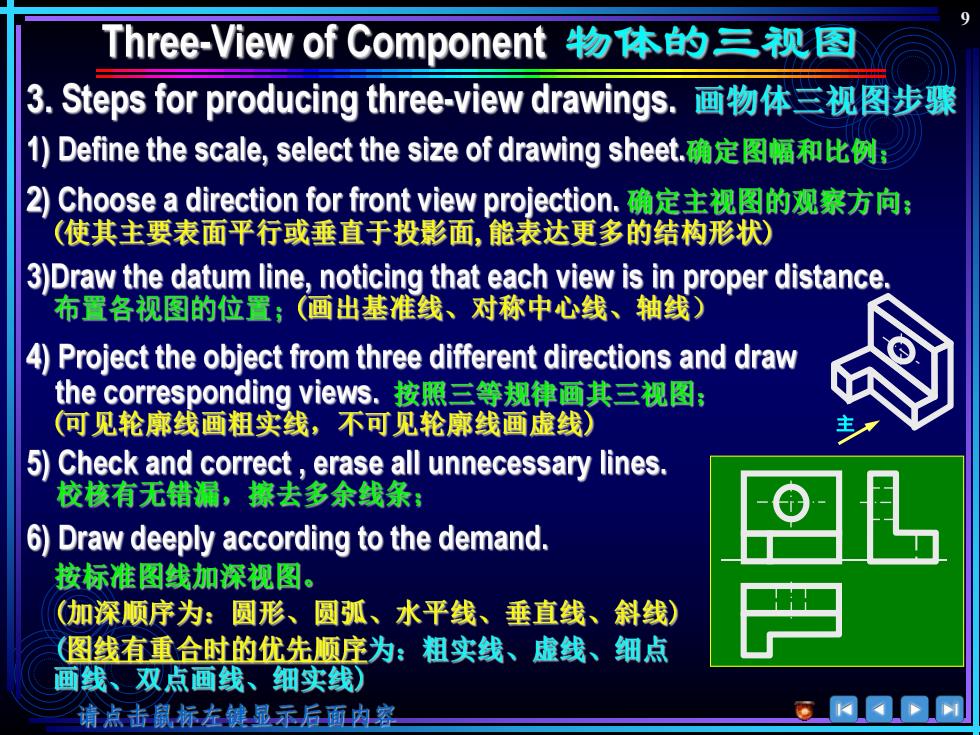
Three-View of Component物体的三图 3.Steps for producing three-view drawings.画物体三视图步骤 )Define the scale,select the size of drawing sheet.确定图幅和比例; 2)Choose a direction for front view projection.确定主视图的观察方向; (使其主要表面平行或垂直于投影面,能表达更多的结构形状) 3)Draw the datum line,noticing that each view is in proper distance. 布置各视图的位置;(画出基准线、对称中心线、轴线) 4)Project the object from three different directions and draw the corresponding views.按三等规律画其三视图: (何见轮廓线画粗实线,不可见轮廓线画虚线) 5)Check and correct,erase all unnecessary lines. 校核有无错漏,擦去多余线条: 6)Draw deeply according to the demand. 按标准图线加深视图。 (加深顺序为:圆形、圆弧、水平线、垂直线、斜线) (图线有重合时的优先顺序为:粗实线、虚线、细点 画线、双点画线、细实线) 请点击鼠标左键显无后面内容
9 主
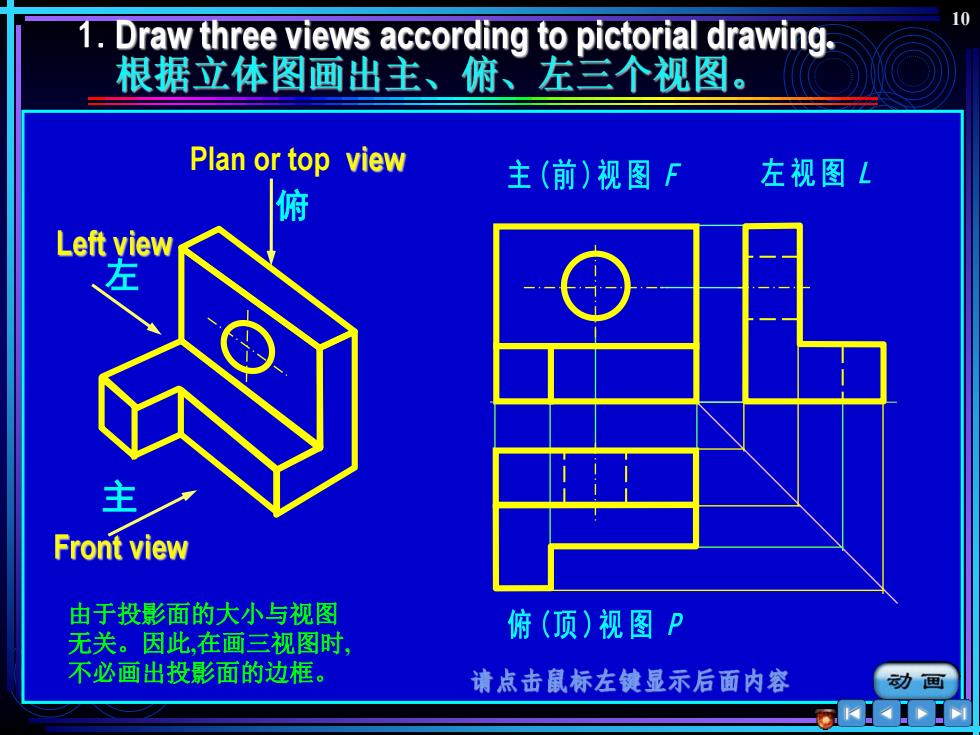
10 1.Draw three views according to pictorial drawing. 根据立体图画出主、俯、左三个视图。 Plan or top view 主(前)视图F 左视图L 俯 Left view 主 Front view 由于投影面的大小与视图 无关。因此,在画三视图时, 俯(顶)视图P 不必画出投影面的边框。 请点击鼠标左键显示后面内容 动画 K.H
10 俯 左 主 Plan or top 1. 由于投影面的大小与视图 无关。因此,在画三视图时, 不必画出投影面的边框