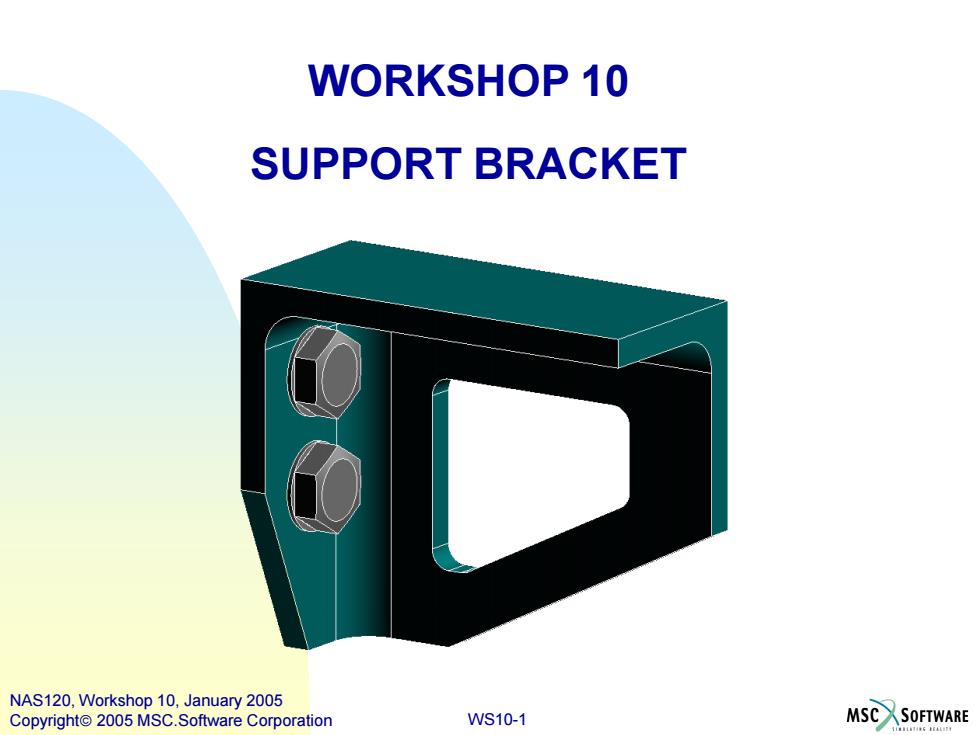
WORKSHOP 10 SUPPORT BRACKET NAS120,Workshop 10,January 2005 Copyright 2005 MSC.Software Corporation WS10-1 MSC SOFTWARE
WS10-1 WORKSHOP 10 SUPPORT BRACKET NAS120, Workshop 10, January 2005 Copyright 2005 MSC.Software Corporation
■Problem Description A bracket is constructed from titanium alloy Ti-6Al-4V with the following properties: E=16x106psiv=0.31 A pressure load of 100 psi is applied to the top face of the support bracket. The bracket is attached with two bolts Model the bracket with tetrahedron elements NAS120,Workshop 10,January 2005 Copyright 2005 MSC.Software Corporation WS10-3 MSCSOFTWARE
WS10-3 NAS120, Workshop 10, January 2005 Copyright 2005 MSC.Software Corporation Problem Description A bracket is constructed from titanium alloy Ti-6Al-4V with the following properties: E = 16 x 106 psi n =0.31 A pressure load of 100 psi is applied to the top face of the support bracket. The bracket is attached with two bolts. Model the bracket with tetrahedron elements
■ Workshop Objectives Import a parasolid part Mesh the part using TET 4 elements Re-mesh the part using TET 10 elements Evaluate the averaged and un-averaged stress results NAS120,Workshop 10,January 2005 Copyright 2005 MSC.Software Corporation WS10-4 MSC SOFTWARE
WS10-4 NAS120, Workshop 10, January 2005 Copyright 2005 MSC.Software Corporation Workshop Objectives Import a parasolid part Mesh the part using TET 4 elements Re-mesh the part using TET 10 elements Evaluate the averaged and un-averaged stress results
Suggested Exercise Steps 1.Create a new database and name it bracket tet4.db 2.Import the parasolid part file support_bracket.xmt. 3.Mesh the part using TET4 elements.Use a global edge length of 0.375 in. 4.Create material and element properties. 5.Constrain the two cylindrical holes to react shear loads(x and y translations). 6.Constrain the back face to react z loads (z translation). 7.Apply 100 psi to the top bracket face. 8.Run the finite element analysis using MSC.Nastran 9.Plot displacements and stresses (averaged,un-averaged,and difference). 10.File save a copy as bracket_tet10.db. 11.Close the database and open the bracket_tet10 database. 12.Delete the original results file. 13.Re-mesh the part with TET10 elements.Use a global edge length of 0.375 in. 14.Re-run the analysis. 1s.Attach the new results file to the database. 16.Plot displacements and stresses(averaged,un-averaged,and difference). 17.Compare the TET10 model results with the TET4 model results. 18.If time permits,re-mesh the model with TET10 elements using a global edge length of 0.125 and run the analysis.This finer mesh will generate more accurate stress results than the previous two models. NAS120,Workshop 10,January 2005 Copyright 2005 MSC.Software Corporation WS10-5 MSC SOFTWARE
WS10-5 NAS120, Workshop 10, January 2005 Copyright 2005 MSC.Software Corporation Suggested Exercise Steps 1. Create a new database and name it bracket_tet4.db. 2. Import the parasolid part file support_bracket.xmt. 3. Mesh the part using TET4 elements. Use a global edge length of 0.375 in. 4. Create material and element properties. 5. Constrain the two cylindrical holes to react shear loads (x and y translations). 6. Constrain the back face to react z loads (z translation). 7. Apply 100 psi to the top bracket face. 8. Run the finite element analysis using MSC.Nastran. 9. Plot displacements and stresses (averaged, un-averaged, and difference). 10. File / save a copy as bracket_tet10.db. 11. Close the database and open the bracket_tet10 database. 12. Delete the original results file. 13. Re-mesh the part with TET10 elements. Use a global edge length of 0.375 in. 14. Re-run the analysis. 15. Attach the new results file to the database. 16. Plot displacements and stresses (averaged, un-averaged, and difference). 17. Compare the TET10 model results with the TET4 model results. 18. If time permits, re-mesh the model with TET10 elements using a global edge length of 0.125 and run the analysis. This finer mesh will generate more accurate stress results than the previous two models
Step 1.Create New Database MSC.Patran 回x File Group ewport viewing Display Preferences Tods Insight Cortrol Help Utlibes New. Ctrl+N 4■图图器■解留厦■■■■■四图■■■■■■■■■■U圆■解 CErl+O ■■ edstacs Mateains Properties toadl 3y0 Cal+s Ssve a Copy Imoort. Session □New Database 回凶 Prnt New Model Preferences tmsges Template Database Name c:vscpatran2001r2/emplate.db Model Preferences For: test db Quit Ctrl+Q Change Templete... -Tolerance Create a new database called CBesed on Model d bracket tet4.db Modify Preferences.. Default a.File New. Look in:Training 中包心国 b.Enter bracket tet4 as the file 0005 name. c.Click OK. Analysis Code d.Choose Default Tolerance. MSC Nastran e e.Select MSC.Nastran as the Analysis Type Analysis Code. Structuralf f.Select Structural as the Analysis Type. File name: bracket_tet4 b OKC OK Reset g.Click OK. Files of type Database Fles (db} Cancel g NAS120,Workshop 10,January 2005 Copyright 2005 MSC.Software Corporation WS10-6 MSC SOFTWARE
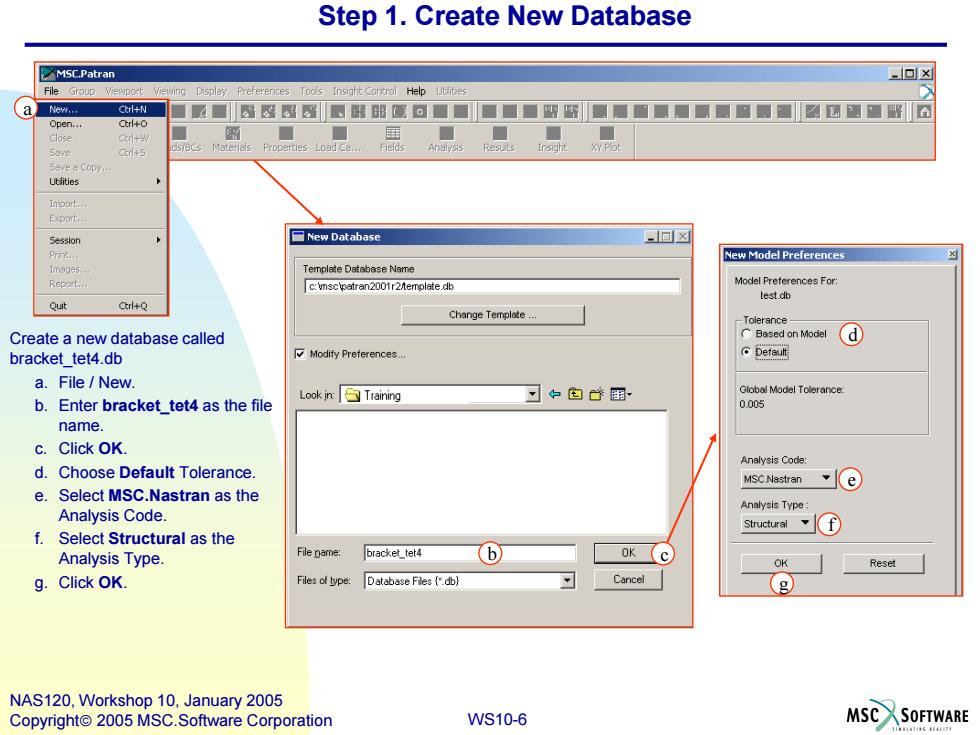
WS10-6 NAS120, Workshop 10, January 2005 Copyright 2005 MSC.Software Corporation a b c d f g Step 1. Create New Database Create a new database called bracket_tet4.db a. File / New. b. Enter bracket_tet4 as the file name. c. Click OK. d. Choose Default Tolerance. e. Select MSC.Nastran as the Analysis Code. f. Select Structural as the Analysis Type. g. Click OK. a e
Step 2.Import Parasolid File MSC.Patran -回x File Group Viewport Viewing Display Preferences Tools Insight Control Help New.. + 所袋分8印串中心@QQ印雕贴贴建:姓L驺6 chto Close Ctrl+W 从国 BCs Materials Properties Load Ca... Save Ctr+5 Save a Copy... Utilities □Import 回☒ Import... a Export... Object: Look in:☐Workshop6 中包昏翻 Model b Session Source: support_bracket.xmt Parasolid xmt Print... Images. Current Group Report... default group Quit CtlQ Parasolid xmt Options Import the Parasolid File a.File:Import. b.Set the object to model File name: support_bracket Applyd) and the source to Files of type: Parasolid Transmit Files ("x") Cancel Parasolid.xmt. c.Select support_bracket.xmt. d.Click Apply. NAS120,Workshop 10,January 2005 Copyright 2005 MSC.Software Corporation WS10-7 MSC SOFTWARE
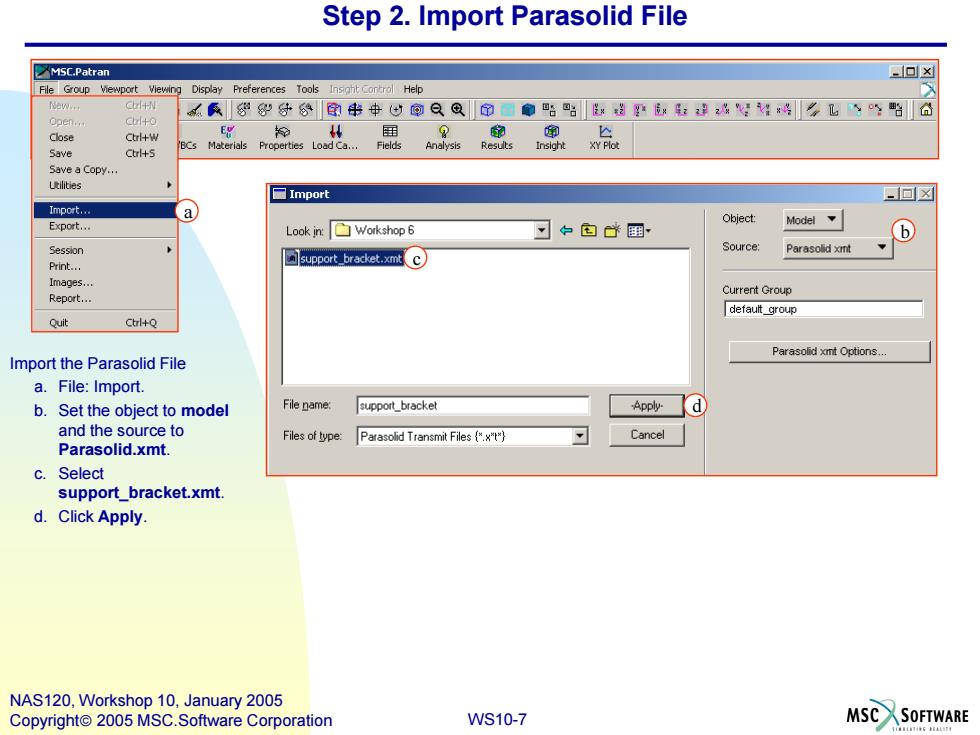
WS10-7 NAS120, Workshop 10, January 2005 Copyright 2005 MSC.Software Corporation Step 2. Import Parasolid File Import the Parasolid File a. File: Import. b. Set the object to model and the source to Parasolid.xmt. c. Select support_bracket.xmt. d. Click Apply. a b c d
Step 3.Create Mesh MSC.Patran ▣x File Group Viewport Viewing Display Preferences Tools Insight Help ☐口日昌电n鸟氏袋9分分串中心@QQ印廊贴路生超平:染4"好#歧飞坚的合 E Geometry Elements Loads/BCs Materials Properties Load Ca. Finite Elements Create a solid mesh Create a.Elements:Create/Mesh Solid. tjec Mesh a b.Set the topology to Soid TET4. Output D Lis过 Node c.Select the entire solid. 目emen d.Enter 0.375 for the Global Edge Length. Elem Shape Tet e.Click Apply. Mesher Topology b Tet4 Tetlesh Poremeters Node Coordinete Frames. nput List Tsald1C Global Edpe Lengh Value o.37s(d】 Assemty Parameters.. Select Existing Prop. Create New Property Ap e NAS120,Workshop 10,January 2005 Copyright 2005 MSC.Software Corporation WS10-8 MSCSOFTWARE
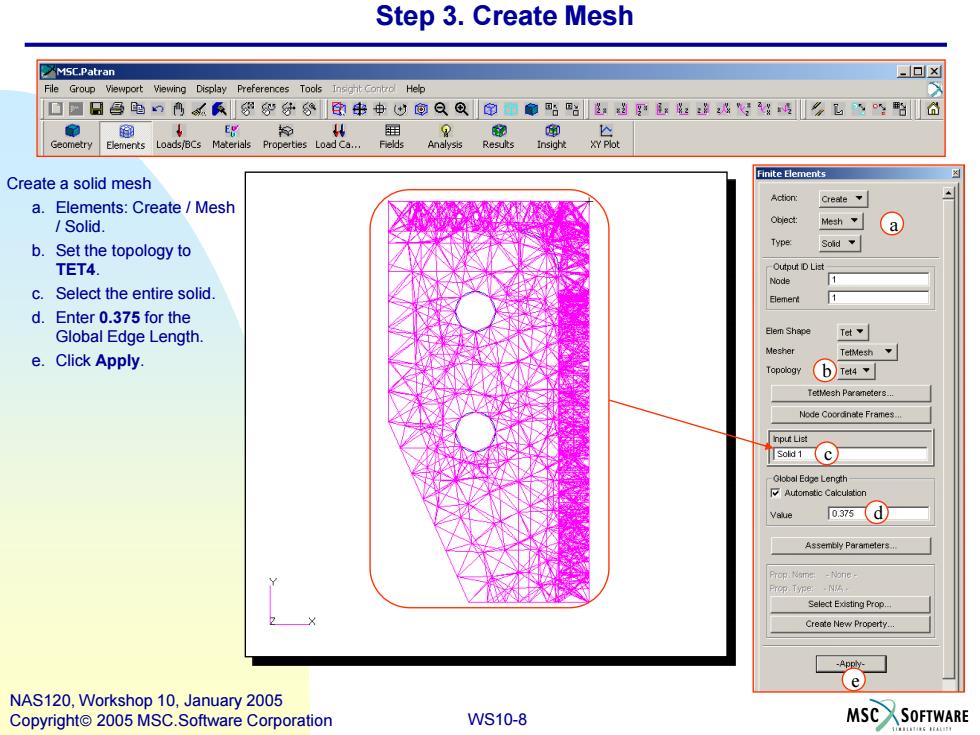
WS10-8 NAS120, Workshop 10, January 2005 Copyright 2005 MSC.Software Corporation Step 3. Create Mesh Create a solid mesh a. Elements: Create / Mesh / Solid. b. Set the topology to TET4. c. Select the entire solid. d. Enter 0.375 for the Global Edge Length. e. Click Apply. a b c d e
Step 4.Create Material and Element Properties MSC.Patran =▣x File Group Viewport Viewing Display Preferences Tools Insight Control Help ☐☐日昌跑鸣袋分分串中心@QQ命扇骆贴进:进好¥么飞d Geometry Elements Loads/BCs Materials Properties Load Ca... Create an isotropic material Input Options 回☒ Materials a.Materials:Create Isotropic Constitutive Model Linear Elastic、 Action Create、 Manual Input. Object Isotropic b.Enter Ti-6Al-4V as the Property Name Value a Manual Inpu、 Material Name. 16e6 c.Click Input Properties Poisson Ratio= 031 d Fiter d.Enter 16e6 for the Elastic Shear Modulus Existing Materials Modulus and 0.31 for the Density= Poisson Ratio. Thermal Expan.Coeff= e.Click OK. Structural Damping Coeff f.Click Apply. Reference Temperature= Temperature Dep/Model Variable Fields: Material Neme Ti-64.4b Description Date:05-Apr-02 Time 121455 Current Consttutive Models: c Input Properties.. Change Material Status.. Clear Cancel f e NAS120,Workshop 10,January 2005 Copyright 2005 MSC.Software Corporation WS10-9 MSC SOFTWARE
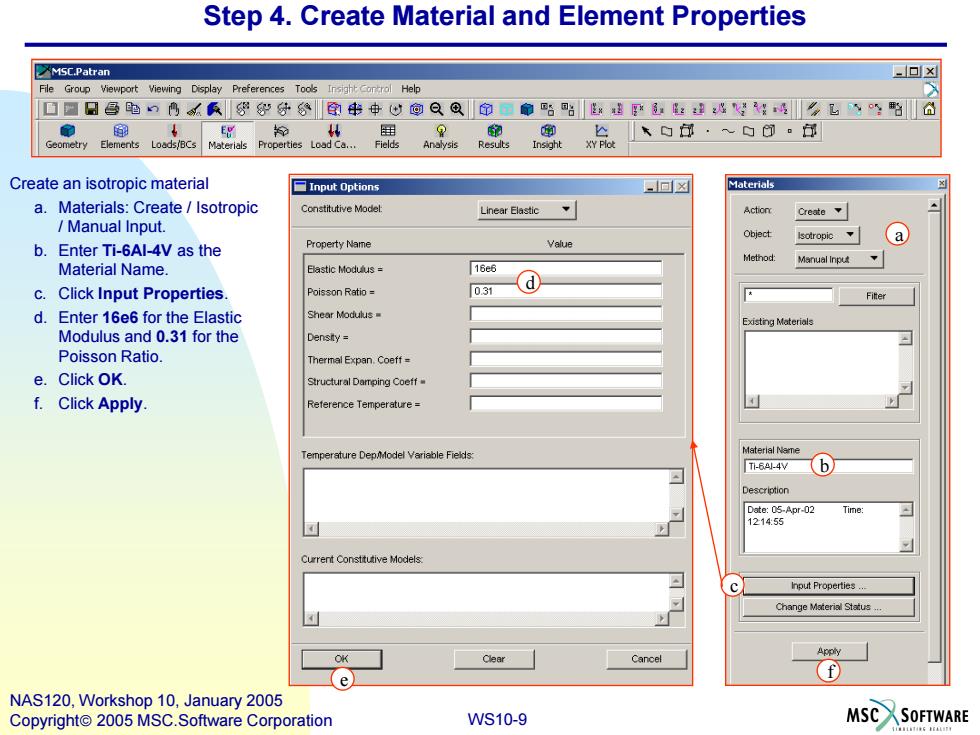
WS10-9 NAS120, Workshop 10, January 2005 Copyright 2005 MSC.Software Corporation Step 4. Create Material and Element Properties a c b Create an isotropic material a. Materials: Create / Isotropic / Manual Input. b. Enter Ti-6Al-4V as the Material Name. c. Click Input Properties. d. Enter 16e6 for the Elastic Modulus and 0.31 for the Poisson Ratio. e. Click OK. f. Click Apply. d f e
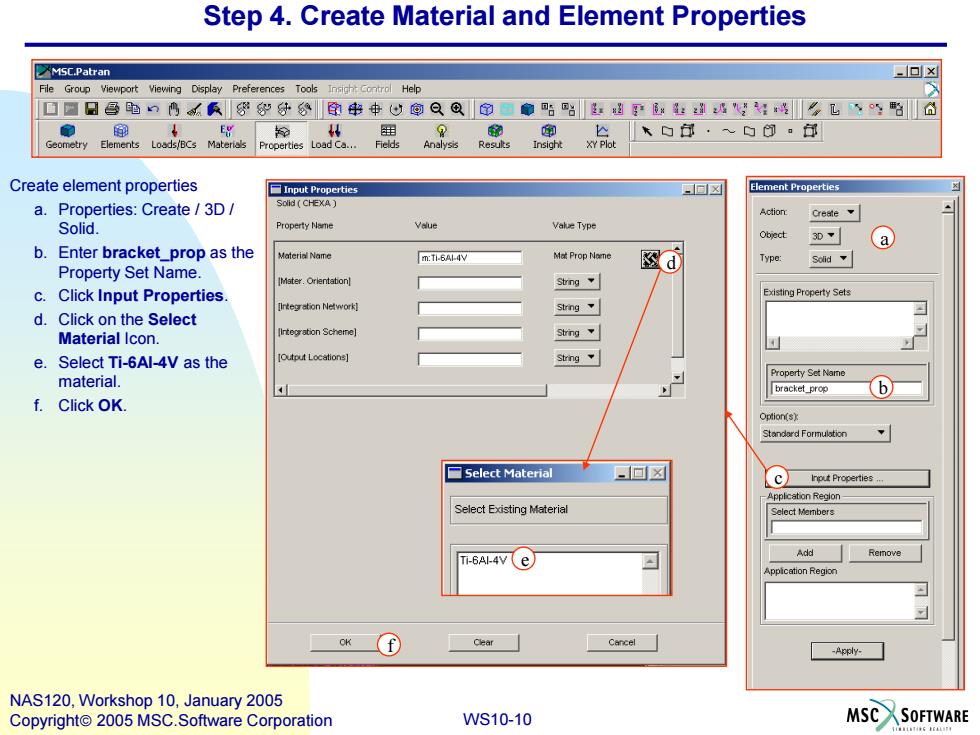
Step 4.Create Material and Element Properties MSC.Patran -▣x File Group Viewport Viewing Display Preferences Tools Insight Control Help ▣☐日昌电鸣民分公印串中以@Q@命型贴路磁孕数好飞学陷6 Geometry Elements Loads/BCs Materials Create element properties 百Input Properties 回☒ Element Properties a.Properties:Create/3D/ Solid CHEXA) Action Solid. Value Vale Type 30 a b.Enter bracket_prop as the Material Name m:Ti-6Al-4V Mat Prop Nome d ype: Solid Property Set Name. IMster.Orientation] String C. Click Input Properties Existing Property Sets ntegration Nework灯 String.、 d.Click on the Select Material Icon. itegrstion Scheme] String e.Select Ti-6Al-4V as the Output Locations] String Property Set Name material. bracket_prop 6 f.Click OK. ption(s) Standerd Formulation □Select Material 一▣☒ 【C Input Properties Applcation Region- Select Existing Material Select Members Ti-6AI-4V (e) Add Remove Appication Region OK -Apply- NAS120,Workshop 10,January 2005 Copyright 2005 MSC.Software Corporation WS10-10 MSCSOFTWARE
WS10-10 NAS120, Workshop 10, January 2005 Copyright 2005 MSC.Software Corporation Step 4. Create Material and Element Properties Create element properties a. Properties: Create / 3D / Solid. b. Enter bracket_prop as the Property Set Name. c. Click Input Properties. d. Click on the Select Material Icon. e. Select Ti-6Al-4V as the material. f. Click OK. a b c f e d
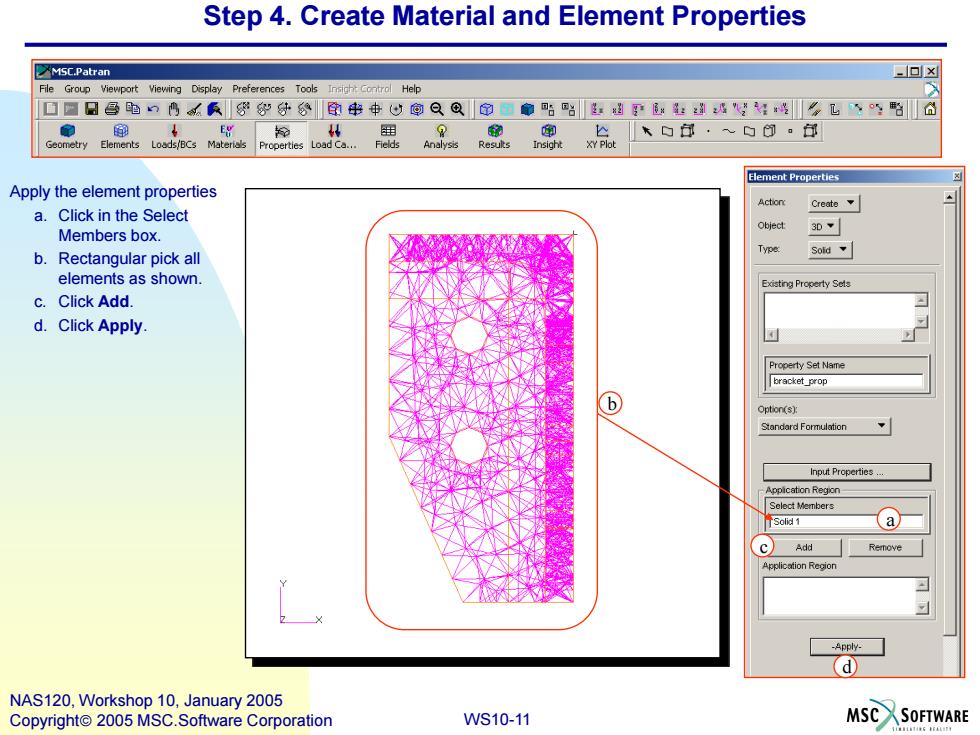
Step 4.Create Material and Element Properties MSC.Patran -▣x File Group Viewport Viewing Display Preferences Tools Insight Contral Help ☐☐日昌电口鸣零好分分印串中心以@QQ命中●贴路超"好飞野合 Element Properties Apply the element properties Acton Create a.Click in the Select Object 3D~ Members box. Type b.Rectangular pick all elements as shown. Existing Property Sels c.Click Add. d.Click Apply. Property Set Name bracket prop Option(s) Stondard Formulation Input Properties pplcation Region Select Members 、a Add Remove Region -Apply- d NAS120,Workshop 10,January 2005 Copyright 2005 MSC.Software Corporation WS10-11 MSC SOFTWARE 4
WS10-11 NAS120, Workshop 10, January 2005 Copyright 2005 MSC.Software Corporation Apply the element properties a. Click in the Select Members box. b. Rectangular pick all elements as shown. c. Click Add. d. Click Apply. a b c d Step 4. Create Material and Element Properties